Pages

Wednesday, December 31, 2008

CodeIgniter rss powered by Zend Framework Zend_Feed

In a recently project that we had to finish (started by a different company, went for two years and wasn't finished yet) we handled with a lot of legacy code which used CodeIgniter as a web development framework...

Refactoring it is another discussion because it's a nice case study how not to generate html code in your controller (which containes over 12.000 lines of code - it's a right figure, we still have in svn the original file) and the entire application has 2 controllers - 12k lines of code x 2 (one for frontend and one for backend) and 2 views (pretty cool eh?).

Delivering fast results means no time rewrite an entire application... A nice feature we added is rss feeds. For that we used Zend Framework component Zend_Feed embeded in a CodeIgniter controller... Application structure is:

/
/system
/system/application
/system/application/controllers
/system/codeigniter
[...]
/Zend
/Zend/Feed
.htaccess
index.php

We included in the Zend folder only Zend_Feed and dependencies for this job... Tried to use a Package Maker for Zend Framework, but it does not seem to work (did not included EmailValidation and so on...) Setting up include_path: In index.php add the following line:

set_include_path(getcwd().PATH_SEPARATOR.'.');
So when you call require_once 'Zend/something' - will work.
class Rss extends Controller {

function Rss() {   
   parent::Controller();
   $this->load->helper('text');
   $lang = $this->phpsession->get('lang');
   if(empty($lang)){
       $lang = 'ro';
   }
//...
}

/**
* last 10 news
*
*/
function news()
{

   #load up zend feed
   require_once 'Zend/Feed.php';
   $array = array(
       'title'       => 'FEED TITLE HERE', //required
       'link'        => $_SERVER['REQUEST_URI'], //required
       'lastUpdate'  => time(), // optional
       'published'   => time(), //optional
       'charset'     => 'utf8', // required
       'description' => 'COMPANY NAME news feed', //optional
       'author'      => 'COMPANY NAME', //optional
       'email'       => 'office@example.com', //optional
       'webmaster'   => 'office@example.com',
       'copyright'   => 'All rights reserved COMPANY NAME', //optional
       'image'       => 'http://www.example.com/logo.gif', //optional
       'generator'   => 'myZFeed', // optional
       'ttl'         => '60'
   );


   $fields = array('title','short_descr','descr');
   $lang       = $this->phpsession->get('lang');   
   if($lang=='en'){
       //smart piece of code :)
       $sql_select_fields = array_reduce($fields,create_function('$v,$a','$a .= \'_en as \'.$a;$v.=\',\'.$a; return $v;'));
   } else {
       $sql_select_fields = ','.implode(',',$fields);
   }

   //table name, news in Romanian
   $table = 'noutati';
   $limit = 10;   
   $this->db->select('id '.$sql_select_fields.', UNIX_TIMESTAMP(dt) as rss_timestamp');
   $this->db->where('visible',1);
   $this->db->order_by("dt", "desc");
   $query = $this->db->get($table,$limit);
   foreach ($query->result() as $row){

       $array['entries'][]     = array(
           'title'        => $row->title, //required
           'link'         => $this->config->config['base_url'].'/start/news_details/'.$row->id,
           'description'  => word_limiter($row->short_descr, 20),
           'content'      => $row->descr,
           'lastUpdate'   => $row->rss_timestamp
       );
   }

   $rssFeedFromArray = Zend_Feed::importArray($array, 'rss');
   $rssFeedFromArray->send();
}

}
That's it. Now you have a working rss feed in a CodeIgniter application powered by Zend_Feed :) Session is opened to questions :). Note: will not share the 12k lines of code file... Not sure about copyright and stuff....
Tuesday, December 30, 2008

Zend Framework - disable layout and view rendering

I wanted to add rss to a list of items for the todo list application. I used Zend_Feed for creating the rss... But, my application has a layout and a view and I needed to disable layout and view. This solves it:

public function rssAction()
{
#disable layout     
$this->_helper->layout()->disableLayout();

#disable view rendering
$this->_helper->viewRenderer->setNoRender();
//other stuff here
}

Zend Framework Quickstart Tutorial - Todo List - MySQL version - part 1

Making a screencast takes me awful lots of time so instead I find easier to follow a tutorial written with screenshots and code samples.

0. Introduction

The main idea is to create a todo list application using Zend Framework with the following features:

  • todo lists (eg: Grocery list, chores, daily naps, etc.)
  • each lists can have todo items
  • each item can be active/done
  • mark items as done or delete them

That's about it.

0.1 Installing Zend Framework

I downloaded the 1.7.2 version of Zend Framework and unzip it in ../htdocs/ZendFramework-1.7.2
I edited my php.ini file so I have Zend Framework path in include_path:
include_path = ".;C:\web\Apache2.2\htdocs\ZendFramework-1.7.2\library"
If you are on a Unix platform, instead of ; use : as a separator.
Now, I can use:
require_once "Zend/Loader.php";
without using set_include_path()
1. Application structure My php5 development env is on a Windows Vista and my htdocs directory is located: C:\web\Apache2.2\htdocs
1.1 Create a new folder: zftodo
Create a new folder: zftodo in your htdocs directory.
1.2 Checkout the app structure from google code
svn checkout http://zfquickstartmysql.googlecode.com/svn/trunk/zftodo-start zfquickstartmysql-read-only
2. Creating database and granting access In scripts directory you will find a file: db.mysql.sql If you have privileges for creating a new database and granting access run that sql. If you don't have privileges for doing that, skip that and change application/config/app.ini:
[development]
database.adapter       = "PDO_MYSQL"
database.params.host   = "db host here"
database.params.username   = "db username here"
database.params.password   = "db password here"
database.params.dbname = "db name here"
3. Test your application Open your browser and go to the following url: http://localhost/zftodo/public/ (or change it depending on your web server configuration).
You'll see the following message:
Hello, from the Zend Framework MVC!
    I am the index controllers's view script. 
To change the contents you can edit:
  • application/layouts/scripts/layout.phtml (for the layout)
  • application/views/scripts/index/index.phtml (for index contents)

Now you are all set and we can proceed to part 2 of the tutorial where we actually get something working :)

Monday, December 29, 2008

PHP Framework trends - Zend Framework vs Symfony vs CakePHP vs CodeIgniter

This graph is for the last 12 months Google trends Zend Framework vs Symfony vs CakePHP vs CodeIgniter
zend framework
1.00
symfony
1.14
cakephp
1.35
codeigniter
0.50

Sunday, December 28, 2008

How to add syntax highlighting to you blogger.com blog

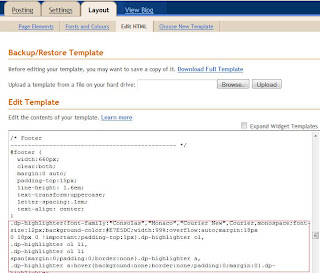
For syntax highlighting I chose the project: SyntaxHighlighter After you log in to your account, go to Layout -> Edit Html At the end of css declaration add the css from svn trunk as shown in the image above. Next, go to the end of your template html, and add the following code:
//these are src for script language javascript tag which I cannot write here:
http://syntaxhighlighter.googlecode.com/svn/trunk/Scripts/shCore.js
http://syntaxhighlighter.googlecode.com/svn/trunk/Scripts/shBrushPhp.js
http://syntaxhighlighter.googlecode.com/svn/trunk/Scripts/shBrushSql.js
http://syntaxhighlighter.googlecode.com/svn/trunk/Scripts/shBrushCss.js
http://syntaxhighlighter.googlecode.com/svn/trunk/Scripts/shBrushJScript.js
http://syntaxhighlighter.googlecode.com/svn/trunk/Scripts/shBrushPython.js

//wrap this in a script tag
dp.SyntaxHighlighter.ClipboardSwf ='http://syntaxhighlighter.googlecode.com/svn/trunk/Scripts/clipboard.swf';
dp.SyntaxHighlighter.HighlightAll('code');

Scripts in html documents And here is a sample php usage:
$var = 'Sample usage';
#comment here

Zend Framework Quickstart - MySQL version

As you might noticed, Magento platform is built on top of Zend Framework. Recently released 1.2 version of Magento eCommerce Platform includes Zend Framework 1.7.2. Zend Framework Quickstart is a good place to start getting an idea about using ZF to build applications. I wrote earlier about installing Magento from svn. The next steps include creating a custom module (todo list, a guestbook something simple for an introduction in creating a custom module for Magento) and connecting Magento with 3rd party applications. I have the following structure on my laptop that I use for development: htdocs is in
C:\web\Apache2.2\htdocs
Zend Framework library:
C:\web\Apache2.2\htdocs\ZendFramework-1.7.2\library
and I've set in php.ini:
include_path = ".;c:\php\includes;C:\web\Apache2.2\htdocs\ZendFramework-1.7.2\library"
1. Create a folder and unzip Quickstart sample application in that folder:
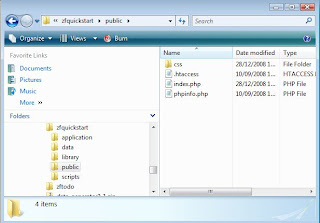
C:\web\Apache2.2\htdocs\zfquickstart #in my case
2. Setup application paths Because you will not build a single application with ZF I don't see a good idea in including ZF within each application (that library folder in sample application folder). I keep it outside in htdocs and I've setup in php.ini include_path so I won't need to override include_path using set_include_path... So, if you want to change include_path in your php.ini you can do that. Or you can change index.php:
#set_include_path(APPLICATION_PATH . '/../library' . PATH_SEPARATOR .get_include_path());
set_include_path('C:/web/Apache2.2/htdocs/ZendFramework-1.7.2/library'.PATH_SEPARATOR . get_include_path());
So start your browser and go to: http://localhost/zfquickstart/public/ You will see a success message from IndexController:
Hello, from the Zend Framework MVC!
I am the index controllers's view script.
View file is application/scripts/index/index.phtml Another thing that we need to fix is the base url, because css file for example is included as /css/global.css and we are in /zfquickstart/public/ and the correct path should be /zfquickstart/public/css/global.css There are many ways to solve that, using Zend_Router and so on... In bootstrap.php find:

$frontController->setControllerDirectory(APPLICATION_PATH . '/controllers');
#add this (you can create a piece of code to extract this from url):
$frontController->setBaseUrl('/zfquickstart/public');
#also find:
$view = Zend_Layout::getMvcInstance()->getView();
$view->doctype('XHTML1_STRICT');
#and add this line
$view->baseUrl = Zend_Controller_Front::getInstance()->getBaseUrl();
and in layouts/scripts/layout.phtml:
headLink()->appendStylesheet($this->baseUrl.'/css/global.css') ?>
And now you have a nice css added to your layout. Now open public/.htaccess and replace:
RewriteRule ^.*$ /index.php [NC,L]
#with
RewriteRule ^.*$ index.php [NC,L]
3. Setting up database for Zend Framework QuickStart application - MySQL version Create database and grant access:
create database zfquickstart;
grant all on zfquickstart.* to 'zfquickstart'@'localhost' identified by 'zfquickstart';
flush privileges;
schema.mysql.sql:
CREATE TABLE `zfquickstart`.`guestbook`(
`id` INT (8) UNSIGNED NOT NULL AUTO_INCREMENT,
`email` VARCHAR (50),
`comment` TEXT,
`created` DATETIME,
PRIMARY KEY(`id`)
) TYPE = MyISAM;
data.mysql.sql

INSERT INTO guestbook (email, comment, created) VALUES
('email.email@zendfoo.com', 'Hello! Hope you enjoy this sample zf application!', NOW());
INSERT INTO guestbook (email, comment, created) VALUES
('foo@bar.com', 'Baz baz baz, baz baz Baz baz baz - baz baz baz.', NOW());
You can run the above sql with phpmyadmin/some mysql gui... or you can create a version for load.mysql.php in scripts folder to load this sql intro database... Now, setting up config. In application/config/app.ini, add this section:
[development]
database.adapter       = "PDO_MYSQL"
database.params.host   = "localhost"
database.params.username   = "zfquickstart"
database.params.password   = "zfquickstart"
database.params.dbname = "zfquickstart"
Note: in bootstrap.php the environment is development:
defined('APPLICATION_ENVIRONMENT')
 or define('APPLICATION_ENVIRONMENT', 'development');
That's it for now... Next episode: Creating a todo list application with Zend Framework

Friday, December 26, 2008

Magento 1.2 Alpha is available on SVN

Magento just published on twitter and their blog the Magento 1.2 alpha availability on SVN. List of changes in Magento 1.2 is also available. Fixed stuff regarding i18n and layout, calculations, taxes and so on... Also ZF is upgraded to 1.7.2... A new feature is: downloadable products (a sneak peak was published a few days ago on Magento's blog: Sneak Peek: Downloadable Products in Magento 1.2); another feature is the fulltext search... Being an alpha version we will see more changes in the near future... I eagerly expect fixes in documentation, wiki urls and so on, because it looks totally unprofessional to see recommended articles on Wiki linked to pages that do not exist (eg: lightbox integration article - now is features but the page is empty in wiki), incomplete documentation and so on... Happy Holidays!

Thursday, December 25, 2008

Installing Magento from SVN

On Magento website, go to Downloads -> SVN. Current version is Magento 1.1. To svn checkout (latest stable):
svn checkout http://svn.magentocommerce.com/source/branches/1.1
Create a folder in htdocs magento11 an checkout using a svn client (Tortoise svn for windows is really nice). If you have a webserver installed on your system, acces:
http://localhost/magento11/
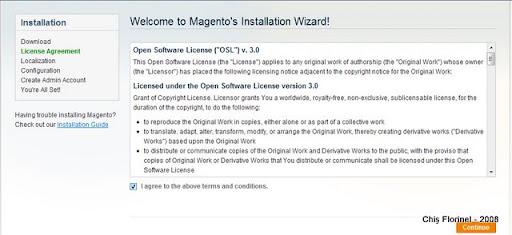
Automatically you will be redirected to install: Make sure you have mod_rewrite enabled, and Allow override so Magento's .htaccess file can override some configs. 1. First step in installing Magento is to agree terms and conditions:
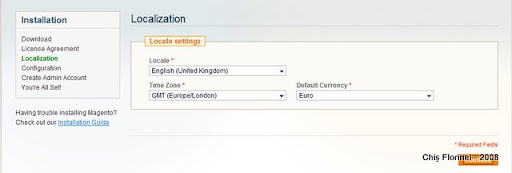
2. Localization (note: I can't seem to find UK Pound in the list):

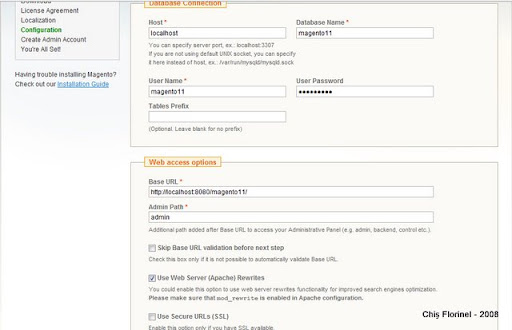
3. Database connection and Web access options: Make sure you provide a valid account for MySQL.
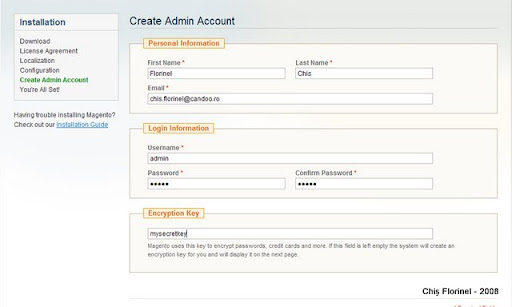
4. Personal Information, Login Information and Encryption Key:
5. You are all set!

Magento introduction

I followed Magento progress from the beginning. I decided to write a series of tutorials referring for the first chapter to importing and connecting Magento to other systems... Magento API allows interaction through SOAP and XML RPC protocols. Most entities covered, so you can use the API to import/export Customers, Products, Invoices and so on... If you have an ERP system already with your products defined there and you want to expose some of them to web and sell them online (e-commerce website), well, that's what you need. Magento API is permission based, so you need to define users and roles... Also keys for accessing the web service. The authentication part looks like this:

$proxy = new SoapClient('http://mymagento.localhost/api/soap/?wsdl');
$sessionId = $proxy->login('api-user', 'your-api-key-here');
First we talk about this autentication part and then we shall import and export some products, customers maybe interaction with an open source CRM like vTiger and Sugar CRM.

Tuesday, December 23, 2008

I'm in UK for holidays...

This year is almost over... So on 23rd I'm going to Uk's airport Heathrow with a stop in Amsterdam... I will post my New Year's Resolution at a later time... Right now, I still have one more day to work and pack my bags... I also have to take care of 2 Christmas trees (home and office)...

Thursday, November 13, 2008

Convergence 2008 - Copenhagen, Denmark

This year is my second time I'm attending Microsoft Convergence in Copenhagen, Denmark. Executive Speakers are Jeff Raikes (whom I met last year, had the change to clarify with him some issues) and Kirill Tatarinov. Sessions will cover ERP discussions (AX, NAV, GP, SL), CRM, BI, Office, etc. For an upcoming project that Candoo will develop in 2009 (whole year) I'm very interested in SaaS solutions for ERP/CRM and Office Live. So, Meet me @ Microsoft Convergence 2008 in Copenhagen, Denmark :)

Friday, October 24, 2008

OpenVPN and Windows Vista updates - autentication with username and password

Because the server guys changed some stuff for the OpenVPN, I was unable to connect ... Uninstalled and installed a new version (stable)... Did not work for me... I have Windows Vista Home Premium installed on my laptop so I don't know if is relevant... Uninstalling the OpenVPN did not go as planned, beacause the TAP adapter remained... Anyway, the solution seems to be the recenly Release Candidate: OpenVPN 2.1_rc13 -- released on 2008.10.09 [download Windows Installer] Now I use OpenVPN without a key, with username and password...

Sunday, October 19, 2008

Fetch urls anonymously with Python urllib2 and Tor

For various purposes (web scrapping, spiders, data extraction, etc) you need to use anonimity... 1. Install Tor 2. Check if Tor is working 3. Write your script in Python
import urllib2
proxy_support = urllib2.ProxyHandler({"http":"http://127.0.0.1:8118"})
opener = urllib2.build_opener(proxy_support)
url='http://whatismyip.com/'
page = opener.open(url)
contents=page.read()
print contents

And that is all

For web scrapping you can use Beautiful Soup. Adding some Beautiful Soup:
import re
from BeautifulSoup import BeautifulSoup
soup = BeautifulSoup(page)
h1Tags = soup.findAll('h1')
#ip address text is in a 2nd h1 tag:
ip = re.sub(r'<[^>]*?>', '', str(h1Tag[1]))
print ip
If you want to see some readable text, see the page source, there is a comment about which url you can access to see only the IP address...

Thursday, June 05, 2008

Giving a hand...

From time to time I still get some comments referring to Open-VPN on Windows Vista. I am glad that I could help. I hope to allocate more time to writing useful information in daily activity. Best regards,

Friday, March 28, 2008

What can help your activity

I don't write that often on this blog. My intention was to offer some quality articles that can help you in your daily activity, no matter if you are a programmer, a web developer, a project manager or you have a lead position... The most successfull article is about Open-VPN on Windows Vista... Also the other technical articles are quite visited... So, now I ask you: what would help you in your daily activity? tech stuff, how-tos, advice, tips&tricks... I can cover a large scope of activities in many OS (win, linux, mac), programming languages, frameworks, project management and so on... Next action is to gather input, filter it and make a poll.